How Plush Toys Are Made - Start to Finish!
This is how we make them plush thangs and get them to you.
Creating a plushie may seem simple—draw the thing, pick materials, put it together. But they go through a very detailed process to make sure they meet certain standards, whether that's from a creative, manufacturing, or a legal standpoint. From the initial idea to production and shipping, each step requires creativity, attention to detail, and a commitment to quality.
Whether they're made individually at home or mass-produced, it takes a lot of work. Let’s take a look at how it all happens!
(This article will cover working through a manufacturer to create a chosen design. I don't have experience hand-making plushies, so I apologize for the lack of that info! There is a great set of guides and tutorials here if you want to learn how to hand-make plushies.)
Step 1: Designing Your Perfect Plushie
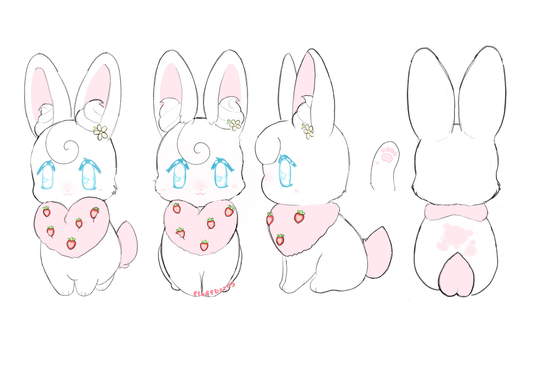
Though it isn't easy, this may be the most straightforward link in the chain. Every plush toy starts with a drawn idea. Whether inspired by an animal (like Angel here), a character in media, or a big monster with tentacles, the design phase is where the magic begins.

- Sketching the Concept: Artists/designers start by drawing out the plush from different angles, figuring out details like size, shape, quirks, and facial features. Every little detail! It's a good idea to work on a large canvas with a high DPI, assuming you're doing digital. We do 5000x5000px on 300 dpi. You want to be able to blow up the image without it getting fuzzy. You can also work with vectors to avoid this issue. We like to do front, back, side, and 3/4 views. There are also detail views on separate pages for important bits.
- Choosing Materials: The right type of fabrics and stuffing make a huge difference in softness and durability. There are a ton of options, don't underestimate the textile industry. There are options spanning plastics (polyester), wool, yarn, organic cotton, you name it. You can also pick the level of stuffing! It really helps to include a photo reference of what you want each material to look like.
- Creating a Tech Pack: This is then drafted into something called a "tech pack," a document for the manufacturer that shows every single detail of the design all in one place. It's normally 2-5 pages. This document includes colors, material choices, photo references, and drawings of the design from several angles to make the proportions as clear as possible. Make sure you are absolutely clear about every detail, because even little things can be misunderstood. Don't waste time by not saying whether something is plush or embroidered or if it should be a different fabric.
Lil Guy Tip! Even small details—like eye/mouth placement or the amount of stuffing—can change the entire personality of a plushie! Test details in many different ways to make sure you get it just how you want it.
Step 2: Finding the Right Manufacturer
All manufacturers are definitely not created equal, and finding the right one takes time. Quality, reliability, and attention to detail are all major factors in this decision.
- Researching & Contacting Manufacturers: We carefully vet potential partners to ensure they meet our quality standards. This includes carefully looking over all the examples of their work, videos/images of the factory, certifications, and reviews. If you've got the time and money, you can even go to visit them. You can find manufacturers on several different sites, the most popular being Alibaba. This process can seem daunting, but take your time and don't jump at anything until you're sure. You'll save time and money by being careful! You should pick a small handful of manufacturers to sample with so you have options, at least 3 of them. It can take time to get a sample back, so just message them all around the same time if you can. Yes it may be expensive, but trust me: saving yourself the time of taking a chance on just one for two months is priceless. PS: make sure you can afford their MOQ (minimum order quantity). Some are as low as a single item and some are as high as 2,000 items or more per order. Keep in mind the full price you'll pay in the end is the cost of the MOQ, shipping to you or the warehouse, and any customs, duties, or taxes.
- Sending the Tech Pack: Once we narrow down our options, we send them the design specifications in a request. They will then respond with whether they can do what we want (some will say they can even if it's not their expertise, that's why we need to be careful). There will be some back and forth about terms and needs before agreeing to request a sample.
- Requesting Samples: A few selected manufacturers create a prototype to see who can bring the vision to life best. During this part, it's important to be reachable by the manufacturer as often as possible. Keep notifications on! You can save days and weeks just by answering their questions as soon as possible due to the likely time difference. Since our team tends to work in the afternoon-evening hours, we overlap with Asia quite well. Note that you don't have to use a manufacturer in Asia if you don't want to, that's just what we did due to the savings and breadth of experience they have in this industry.
This part of the process takes patience—choosing the right manufacturing partner is essential for producing high-quality stuffed animals.
Step 3: Creating & Refining the Prototype
The first sample is rarely perfect, which is why multiple rounds of adjustments are usually needed.
- Reviewing the Sample: You should receive photos of a prototype before you receive an actual plush in the mail. We examine everything—fabric choice, stitching quality, proportions, accuracy, everything. You want to make totally sure that every bit of the plushie is correct from a visual standpoint.
- Making Adjustments: The best way to do this is to take pictures or use the pictures you were given to make edits. Just draw directly over the images on a new layer! You can line where you want the shapes to be and how things should sit. Sometimes, tiny tweaks make all the difference, like slightly bigger eyes or a higher pile on the plush material. Don't ignore any details! Every little thing matters, so try to communicate what you want as clearly as possible.
- Finalizing the Design: Once we’re happy with the sample, we approve it for production. This normally takes a little while, so you'll need some patience. When you get to this step, you need to make sure you're ready! Be sure you know the terms of shipping from your manufacturer as they can differ, be sure you understand what customs may do with your shipment, be sure you have a solid place for it to end up, be sure it has some way to be scanned into inventory (via barcodes), etc. There's a lot to do to complete the whole process.
💡 Pro tip: The prototype phase is crucial because once production starts, changes are much harder (and more expensive) to make!
Step 4: Production Begins!
Once the design is LOCKED in, full-scale production begins.
- Cutting & Sewing: Fabric is cut and stitched according to the final pattern.
- Stuffing & Assembly: Each plush is carefully filled to achieve the perfect level of softness.
- Quality Control: Before moving on, every plush is inspected to ensure consistency and durability.
This part you can sit back for! Ask for updates from your manufacturer. It could take a month or two to complete.
Step 5: Packaging & Shipping
After production is complete, the plushies are carefully packed and sent either to a warehouse or to your home.
- Receiving & Storage: Large orders of plushies are usually shipped with pallets, so if you receive them at home, you may need extra assistance to get them off the truck if you don't pick them up at the dock yourself. If using a warehouse, they'll be received, scanned in, and placed on shelves or in bins of some sort, usually in packaging so they're safe. Some warehousing/shipping companies (also known as 3PLs or third party logistics) also offer quality control inspections on your inventory if you can't do it yourself.
- Order Fulfillment: When an order comes in, the plush is packed the way you specify and sent to its new home. This can include all kinds of options like custom packaging and free cards or items thrown in (called pack-ins). I recommend using recycled or recyclable materials as much as possible. If using a warehouse, they'll generally have shipping pricing deals with the major carriers that you and your customers can take advantage of. If packing at home, you can open business accounts with carriers and get some discounts too!
- The Best Part—Unboxing! Ahh, sweet catharsis... a good unboxing experience can make a huge experiential difference for customers. The options are extremely wide ranging and you can make it as simple or complex as you like. Some people like to use mesh bags and fill it with confetti along with the plush, some people like to use tissue paper, some people even give plushie birth certificates! You can do anything. Get creative!
P.S. I'll make another article later about how to find a good warehouse/shipping fulfillment company! That's its own sort of thing...
Final Thoughts
Creating plush toys isn't as simple as it may seem when you pick one up at the store. They are surprisingly complicated little creatures! Do your best to be careful and particular during each step and it will turn out well. Good luck!
But hey, if you want to skip all that and pick up a lovely little friend without all that hard work, we'll be coming out with our own plushies very soon! We hope you'll look forward to it <3